Showing posts with label Crafts. Show all posts

Saturday, June 23, 2012

Prettying Up Our Mudroom {Book Wreath & DIY Barn Shutter}

The recent addition of this re purposed coat rack and new flooring in our mudroom has encouraged me to pretty up our backdoor entry area.  Wreaths constructed out of book pages are popping up all over blog land and Pinterest.  They are charming and I was certain one would make the perfect addition to our mudroom.  While I do enjoy a good DIY project from time to time, at times well...time is an issue.  Besides somebody has to keep Etsy sellers busy (wink, wink).  I scored this super cute wreath here...


As quickly as I hung up my little beauty I was positive it needed something behind it.  Another layer.  More texture.   


Eric easily put together this "barn" shutter for me and with a quick whitewash this project was pretty simple and straight forward.  Together, the wreath and shutter make a nice addition to our mudroom.  What project have you tackled lately?

Tuesday, June 19, 2012

Sail Away For Ryder's 4th Birthday


In early May, with only a few weeks to spare before his birthday, Ryder and I agreed on a sailboat theme for his birthday party.  His party came together rather quickly and the afternoon was a great success!
 

Ryder Richard was named for my Papa, Fred Richard and with our recent loss I wanted to include a piece of Papa into the decor.  Papa owned and operated Kelley's Upholstery & Canvas for 55 years and together he and Ryder shared a love for both boats and Lake Erie.  While doing some yard work one afternoon for Grandma, Ryder and I came across a scrap piece of sideboard from a boat Papa had worked on.  I had envisioned a "SS Ryder" sign for Ryder's party decor and our found piece of wood was perfect.  I snapped the board in half with my bare feet (no joke!) to give it a jagged look, whitewashed it, and painted the name of our vessel upon the wood.  Alert the coast guard...the SS Ryder is shipwrecked!


Mommy and the birthday boy


Yummy cupcakes!  These super cute sailboat cupcake toppers were easy to make with a little scrapbook paper, sucker sticks, jute, and a hole punch.  I picked up the life ring and netting at Pat Catan's.  The cake stand and wooden tray (made by the hubby) I had on hand.


Ryder is a lover of sweet treats!  These Jell-O boats and chocolate covered Rice Krispie treats were a huge hit with the kids.  Sipping punch is always more fun when it is done through a festive straw!

I love to display photos of the boys at their parties.  With a little jute, ribbon, and tiny clothespins my favorite photos of Ryder from the past year were easy to see.  A piece of Papa's backyard is now in our backyard as well.  For years I have found great delight in his lilac bush out back.  Last fall (unknown to me) Papa transplanted a shoot from his own lilac bush for me.  My mom cared for it over the winter and following his passing we planted it in our yard.  The decorative lighthouse was the last item Ryder purchased for Papa (a few days before he passed).  Indeed, Papa's spirit could be found at Ryder's party!


Daddy and the birthday boy...


Make a wish!


Happy 'lil dude on his new bike Mammy gave him!  Less than a week later the training wheels were OFF and he was keeping up with his older two brothers!


Needless to say Ryder was pretty excited about the dune buggy we got him.  He has been busily looking for a trailer so he can tow it to the sand dunes this summer on our vacation;)  Clearly he wants to follow in his Daddy's footsteps in that regard!


Here is to hoping #4 is a GREAT year for our little Ryder!

Friday, February 3, 2012

Window turned Shelf/Chalkboard

(Disclaimer...this post is long overdue)

 One of my first pins over at Pinterest was this little beauty...


Oddly enough the same day I pinned the above photo to my DIY board I snatched this up at a garage sale...


Despite having an old window on hand AND inspiration the window went untouched.  It sat in our garage.  It sat on our back porch.  It may or may not have made it's way into our basement.  Summer turned to Fall and with Christmas around the corner I got busy re purposing the window.  Sanding.  Painting.  Sanding again.  The hubby helped out by attaching an old piece of wood to the window that became a shelf.  He cut two additional pieces of wood that with a few coats of chalkboard paint became a message board.  Finally, we had re purposed our old, discovered window into this (just in time for Christmas)... 


The piece has turned out to be a great addition to our kitchen.  It is charming.  It has character.  It fulfills my desire of wanting more handmade pieces in our home.  HOMERUN!  What have you re purposed lately?  Share away!


Wednesday, January 11, 2012

Gift From The {Heart}


Sigh...

Swoon...

I have been bitten...

...by the chalkboard paint bug.

Who I am kidding...

Ryan Gosling makes my heart skip a beat, too!
(Shhhh...don't tell the hubby)

Alas, I did not find Mr. Ryan under my tree this (ahem, last) year...

....nor did I gift him to any loved ones this year.

These did make their way into the hands of our loved ones Christmas 2011...


...and they were a HUGE hit!
(and I am hitting myself for not making one for me!)

Cheap Wooden Frame (Wal-Mart) + Chalkboard Paint + Words + Simple Bow + A Perfect Picture = Gift Giving From the Heart Success

Saturday, July 23, 2011

Getting Groovy

We are busily checking items off our Summer To-Do List!  This summer, as a family, we are embracing our need to simply LIVE and be together.  Cleaning, home improvement projects, serious cooking, and blogging have all been placed on the back burner.  We are swimming, game playing, bike riding, ice cream eating, and park going crazies.  Last weekend, with Eric working 5 nights of 12's (cringe), the boys and I happily marked Tie Dye T-shirts off our list.  It was a super fun and messy project we tackled outside.  The end result...check 'em out yourself!


Parker opted for a swirl effect on his shirt...the boys each chose their
desired design, I helped with the rubber bands, and then they
had free reign with the dying process!


Garrett opted for the swirl effect as well, with his center being off center
and lots of green!


Ryder pointed to the bulls eye effect and fully embraced the dying process...holy
puddles of dye!


Hudson put his chubby finger on the sunburst effect...for obvious reasons
he had quite a bit of help when it came time to dye his shirt; however,
his finger prints and hand prints are seen throughout!


My groovy gang....


Hello, reality...

We will definitely be repeating this tie dye project in the future.  However, we will allow our shirts to sit longer to achieve darker colors.  After 6 hours the boys were more than ready to see what the end result was!

Saturday, June 4, 2011

Yellow Yarn Wreath

A few weeks ago, I gave you a sneak peek at my new kitchen...calm blue walls and crisp white trim (that is now covered with fingerprints)...


I am a sucker for all things yellow and couldn't be happier with the PUNCH of color from the "I Love Us" print.  My mom, Sister-in-Law, and I all agreed the kitchen needed a few more pops of this cheerful color.  The door leading to our basement was crying out for a little bit of attention...enter the idea of a wreath.  After a tiny debate with myself, I got busy making a yarn wreath embellished with felt flowers. 


The end result is simple and beautiful.  I will be honest and say wrapping the yarn is rather tedious and time consuming; however, the end result is worth it!  I am still searching for the perfect ribbon to hang this beauty with.  The white loop of ribbon at the top is simply not doing it for me.   


I have a feeling I may be making a few more of these as gifts and perhaps one for our back porch.  There are some awe inspiring seasonal yarn wreaths I have seen that are also begging to be made! 

Wednesday, December 22, 2010

Chic Yarn Trees

Do you follow the sisters over at eighteen25? I recently came across their blog and fell in love with it!  They have super cute (and easy) craft and decor ideas!  I have been working on these yarn trees that I saw on their site and could not be happier with the end result.


My stylish little trees have become part of my Dining Room buffet decor.  If you have some spare time on your hands (okay, maybe not this week) check out the link above for the how-to's!  I will note that I did two layers of yarn on my trees as tiny bits of Styrofoam were peeking through with one layer. 

Happy Crafting!

Monday, November 8, 2010

Tooth Fairy Pillows

The topic of losing teeth is a hot one around our house.  Parker has now lost two and Garrett has his first loose one.  The race is on to see who can lose more!  When Parker was younger, my Mother-in-Law bought him a kit to make a cute tooth pillow when he began losing his baby teeth.  I am clueless as to where it ended up. 

While browsing Etsy a few weeks ago, I did a search for tooth fairy pillow.  Holy cuteness!  The pillows themselves varied in both design and prices.  I found them ranging in price from $4 to $30!  Add in the cost of shipping and I knew I could construct a few pillows myself.  Cheaper!


I had endless amounts of ribbon, buttons, and embroidery floss on hand.  I picked up some sheets of felt (on sale), poly-fil, and a few appliques (again, on sale) and it was time to get to work. 


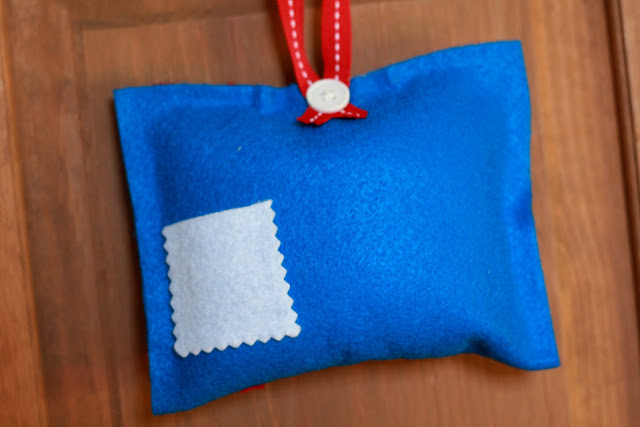
Garrett's finished tooth fairy pillow...his favorite color is blue and I think the little robot is adorable.  I am not thrilled with the button placement (felt tends to stretch some), but overall I am happy with the end result.  I love that he can hang it outside his door or on his bedpost.  Let's be real...some kids may not be thrilled with an unknown fairy coming into their room at night;)


Parker's pillow...number two.  The first one I did found itself in Ryder's hands.  Enough said.  I am digging the purple, green, and black color combo!  Parker is a fan as well! 


On the back of the pillow I put a little pocket for the lost tooth.  In return, the fairy can leave a few coins or rolled up bill in it's place. 

My sewing machine and I are on the outs.  The tension on it has been giving me problem for months.  I need to have someone look at it.  Therefore, this was a no sew project (outside of the buttons).  I used fabric glue and it worked like a charm.  The plan was to hand stitch the outer edges, but to save time I cheated

Bring on the tooth fairy...we are ready!

LinkWithin

Related Posts with Thumbnails